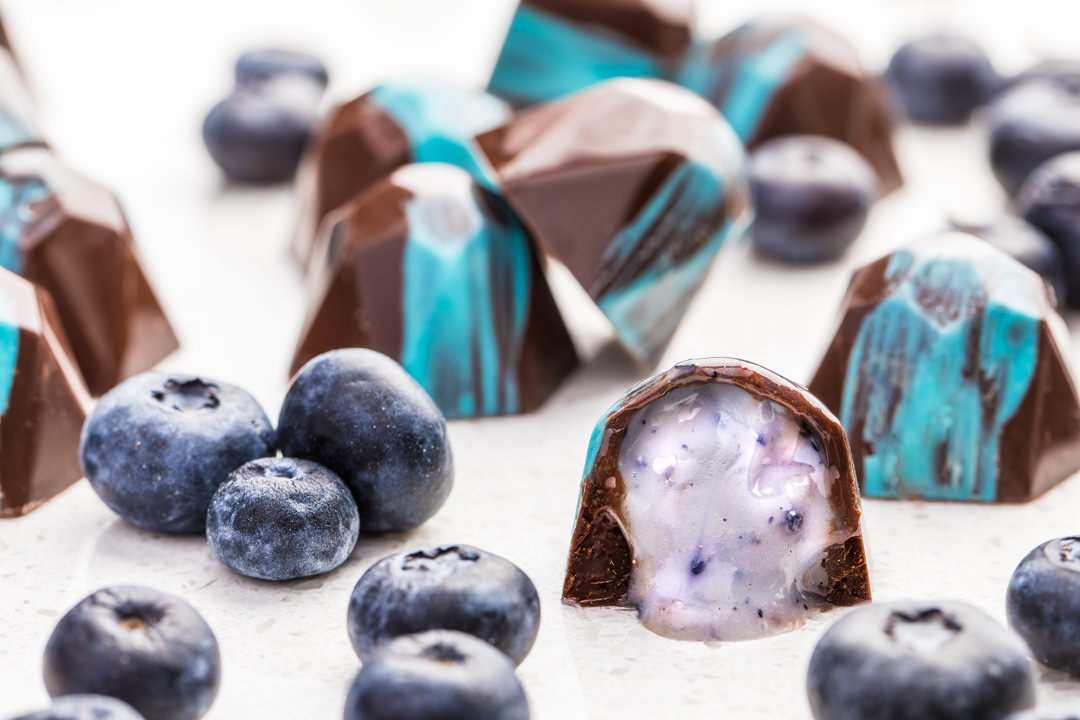
Blueberry White Chocolate Ganache Truffles
Prep time
Cook time
Total time
Dark chocolate molded truffles filled with homemade blueberry white chocolate ganache recipe from SouthernFatty.com.
Author: Phillip Fryman | SouthernFATTY.com
Serves: 24
Ingredients
Chocolate Shells
- 500 grams dark chocolate
- 125 grams dark chocolate
Decorating Outer Shells
- 2 tablespoons raw cocoa butter, I use THIS often
- fool coloring, powder is fairly cheap and best for this application
Blueberry Ganache Filling
- 200 grams white chocolate
- 200 ml heavy cream
- 30 grams freeze dried blueberries
Other Items
- polycarbonate chocolate candy mold, click here for options
- cheesecloth, to buff mold
Instructions
Blueberry Ganache Filling
- Process freeze dried blueberries into a fine powder.
- Warm heavy cream over medium low heat in small saucepan.
- Pour warm cream over white chocolate and allow to sit for about 3-4 minutes to soften.
- Gently stir with a rubber spatula until chocolate is completely incorporated.
- Mix in blueberry powder.
- Transfer to a piping bag and chill while tempering the chocolate. This can be prepared quite far in advance, but will need to be kneaded in the bag to make it pip able if it cools too much.
Prepare the Molds
- If the mold has never been used, you will want to rub a very small amount of the cheesecloth onto the raw cocoa butter before using it to buff the individual compartments.
- Once the mold is used properly, you should be able to simply buff. Much like cast iron, the mold will become seasoned with each use. If you have to wash the mold (ideally, simply blow it out and buff to keep clean.
- Buff each individual mold compartment, getting every corner, if your mold shape has them. Buff well. This is time-consuming but critical to a shiny finish and good release of the candy.
- Once buffed, set aside.
Decorating Outer Shells
- If you would like to brush a design on the mold, slightly warm the tablespoons of cocoa butter. I microwave mine for 15-30 seconds and stir. Do not overheat.
- Add coloring and mix until completely incorporated. Warm as necessary if it solidifies.
- Using a clean pastry brush, brush some of the colored cocoa butter onto the inside of the molds. It may be easier to allow the butter to slightly cool after warming to apply a better coat.
- Decorate all of the molds and set aside.
Chocolate Shells
- Chop all chocolate into very small pieces.
- Before beginning, please take some time to familiarize yourself with the process of tempering chocolate. You can find links in the written content of this blog post for more information.
- Begin by warming the 500 grams of chocolate over a double boiler very slowly to 46-48 degrees C / 118 F.
- Remove from heat and cool chocolate to 27-28 C / 80 F by slowly incorporating the 150 grams of additional chocolate, stirring constantly. This may take a while to cool, as chocolate holds its heat for quite a while. Be patient and continue to stir.
- Place back above a very low simmer and warm melted chocolate to a final temperature of 31-32 C / 88-90 F. Be VERY careful to not exceed this temperature, as you will have to start the process over if so.
- Hold chocolate at this final temperature. I generally remove chocolate from the heat, as it holds for a while. Replace and stir, checking the temperature often as needed.
Filling Shells
- Clean a large surface or complete over a baking sheet.
- Fill the chocolate molds with the tempered warm chocolate (at its final temperature).
- Tap molds to ensure there are no air bubbles.
- Flip mold over and allow chocolate to exit, leaving a very thin coating inside the molds.
- Tap the outside of the mold with a rolling pin or something similar. Get as much chocolate out as possible to ensure a thin, crisp shell.
- While inverted, use a pastry or dough scraper to push away the chocolate, leaving you with only the inside of the shells being coated. Flip right side up and make sure excess chocolate is scraped off. It is important to remove all excess chocolate so that the candies all release individually.
Filling Molds
- Pipe ganache into the hardened molds. Fill about ¾ of the mold. If you add too much, you will not be able to get a good seal and the candy will leak or crack.
- Leftover chocolate (there will be a lot - you will have a hard time heating less quantity) can be kept and used for the same process again later. It may 'bloom', or form a cloudy exterior. This is normal and will disappear when re-tempered.
Capping the Candy
- To seal the candies, I find it easier to place the chocolate (still help at its final temperature) into a piping bag.
- Pipe into each mold and again scrape across the mold to clear excess chocolate.
- Tap mold to release air bubbles and fill in any gaps with additional chocolate.
- Scrape again and allow to rest to completely harden.
- If rushed, can chill the candy for 15-20 minutes.
Releasing the Molds
- To check and see if the candy is ready, you can look on the underside (which will be the top of the candy when released). You should see that the chocolate had released from the mold. If you see spots that have not, those were likely areas not buffed well or you have issues with your chocolate not being properly tempered.
- If you see many or all of the shells are not hardened and released, you can try to chill for an additional 15-20 minutes.
- To release candy, you will flip and bang the mold onto a clean surface very quickly. Don't be too gently, and try to hit it without it being at an angle. You want it to slap down with the entire bottom side of the candies hitting the surface at once.
- The candies should release if everything was done properly.
- That's all! Enjoy your chocolate. Best stored in airtight container chilled. The will fade slightly if kept for a long period.
- Find more recipes on SouthernFatty.com.
Nutrition Information
Serving size: 1-2
Recipe by Southern FATTY at https://www.southernfatty.com/blueberry-white-chocolate-ganache-truffles/